BCD up/down counter
| 4510 |
BCD up/down counter |
|
| Technology: CMOS | Power supply: 3-15 V |
16-pin DIL |
![]() Back to Design Electronics
Back to Design Electronics
 Back to Beastie Zone
![]() Up
Up
BCD stands for Binary Coded Decimal. A BCD counter has four outputs usually labelled A, B, C, D. By convention A is the least significant bit, or LSB. The easiest way to understand what a BCD counter does is to follow the counting sequence in truth table form:
|
pulses |
output D |
output C |
output B |
output A |
|
0 |
0 |
0 |
0 |
0 |
|
1 |
0 |
0 |
0 |
1 |
|
2 |
0 |
0 |
1 |
0 |
|
3 |
0 |
0 |
1 |
1 |
|
4 |
0 |
1 |
0 |
0 |
|
5 |
0 |
1 |
0 |
1 |
|
6 |
0 |
1 |
1 |
0 |
|
7 |
0 |
1 |
1 |
1 |
|
8 |
1 |
0 |
0 |
0 |
|
9 |
1 |
0 |
0 |
1 |
|
10 |
0 |
0 |
0 |
0 |
|
11 |
0 |
0 |
0 |
1 |
|
: |
: |
: |
: |
: |
When pulses are delivered to the CLOCK input (and all the other connections needed for basic operation are made), the outputs of the 4510 follow a sequence starting from 0 0 0 0 up to 1 0 0 1, the binary equivalent of the decimal number 9. The next pulse causes the 4510 to RESET and counting starts again from 0 0 0 0.
In other words, the counter outputs follow a binary sequence representing the decimal numbers 0-9.... this is why the 4510 is called a binary coded decimal counter.
![]() Up
Up
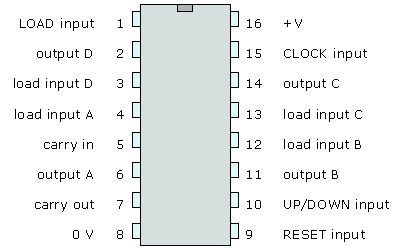
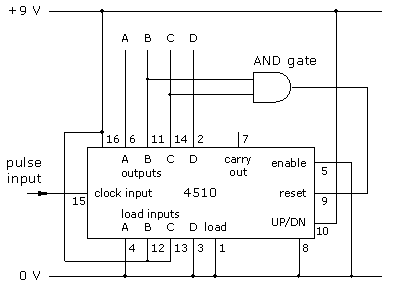
To make the 4510 work, you need lots of connections. Every INPUT of a CMOS integrated circuit must be connected to something. The CLOCK input, for example, will be connected to the output of source of pulses such as an astable. You will also need to connect all the load inputs, the carry in and the up/down input.
Here is the circuit diagram for a simple test circuit:
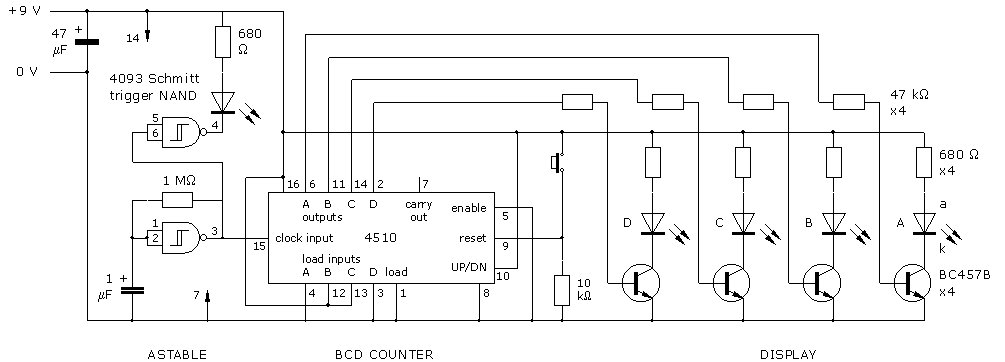
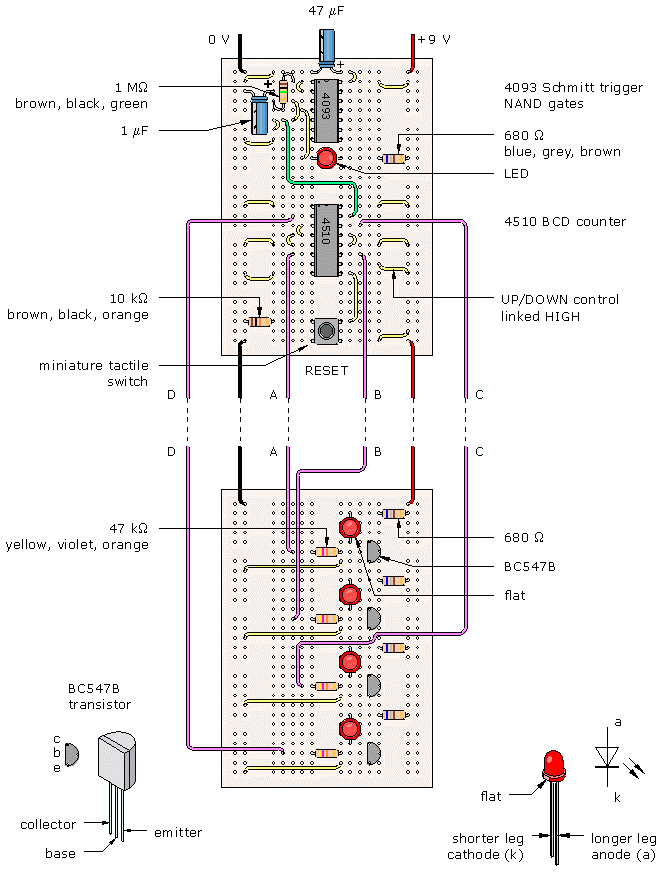
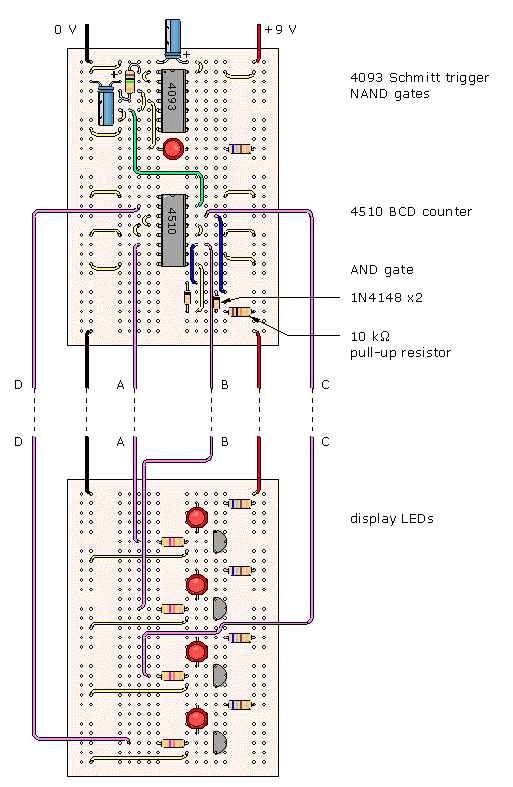
Build this circuit on prototype board:
The 4093 Schmitt trigger NAND gate provides one of the easiest ways of making an astable. When you have built this part of the circuit, the LED next to the 4093 should flash at approximately 1 Hz, possibly a little faster.
Check the pin connections for the 4510 as you build the next part of the circuit:
|
pin |
name |
connections |
|
1 |
LOAD input |
normally held LOW, 0 V |
|
2 |
output D, Q8 |
output, bit 3 |
|
3 |
load input D, L8 |
connect LOW |
|
4 |
load input A, L1 |
connect LOW |
|
5 |
carry in (enable) |
normally held LOW, 0 V |
|
6 |
output A, Q1 |
output, bit 0 |
|
7 |
carry out |
no connection needed |
|
8 |
0 V |
power supply 0 V |
|
9 |
RESET input |
normally held LOW |
|
10 |
UP/DOWN input |
HIGH=UP, LOW=DOWN |
|
11 |
output B, Q2 |
output, bit 1 |
|
12 |
load input B, L2 |
connect HIGH |
|
13 |
load input C, L4 |
connect HIGH |
|
14 |
output C, Q4 |
output, bit 2 |
|
15 |
CLOCK input |
pulses in from astable |
|
16 |
+V |
power supply +9 V (range 5-15 V) |
Don't forget -  - Connect
pin 16 of the 4510 to +9 V and pin 8 to 0 V.
- Connect
pin 16 of the 4510 to +9 V and pin 8 to 0 V.
The final part of the circuit allows you to see the logic states of the counter outputs. When you have built the circuit correctly the LEDs will illuminate following the truth table for BCD counting given earlier.
What happens when you press the RESET switch?
What happens when you connect the UP/DOWN input LOW instead of HIGH?
The 4510 is frequently used together with the 4511 BCD to 7-segment decoder. Refer to the 4511 Beastie Zone page to find out how to connect these integrated circuits together.
![]() Up
Up
What do you do when you want to shorten the count sequence, for example, when you want to use the 4510 as part of the circuit for an electronic die? For a normal die you need just six different output states. This can be achieved by RESETTING the counter when the count reaches 0 1 1 0, the BCD number which represents 6.
Look back briefly at the truth table for BCD counting. When the count reaches 0 1 1 0, outputs B and C are HIGH together for the first time. You can use an AND gate to reset the counter, like this:
You could use a 4081 AND gate integrated circuit as part of this system. However, it is cheaper and more convenient to use a diode/resistor AND gate:
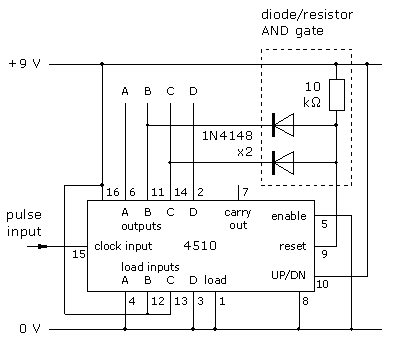
It might not be obvious how two diodes and a pull-up resistor make an AND gate, but this arrangement works. To see it in action, modify your earlier prototype circuit as follows:
Only a few alterations are needed! Remove the miniature tactile switch, move the 10 kW resistor and add the diodes together with two new connecting links.
The count sequence should now be:
|
pulses |
output D |
output C |
output B |
output A |
|
0 |
0 |
0 |
0 |
0 |
|
1 |
0 |
0 |
0 |
1 |
|
2 |
0 |
0 |
1 |
0 |
|
3 |
0 |
0 |
1 |
1 |
|
4 |
0 |
1 |
0 |
0 |
|
5 |
0 |
1 |
0 |
1 |
|
6 |
0 |
0 |
0 |
0 |
|
7 |
0 |
0 |
0 |
1 |
|
: |
: |
: |
: |
: |
You don't see the 0 1 1 0 output state because this immediately RESETs the counter. You do see six different output states from 0 0 0 0 to 0 1 0 1, corresponding to the decimal numbers 0-5.
![]() Up
Up
Shortening the count is just part of the problem of making an electronic die. When it is connected up to a 7-segment display, it would be better if the numbers displayed went from 1-6. To achieve this result, an addtional circuit which converts from 0 0 0 0 to 0 1 1 0 is needed. This code conversion circuit can be made using NOR gates:
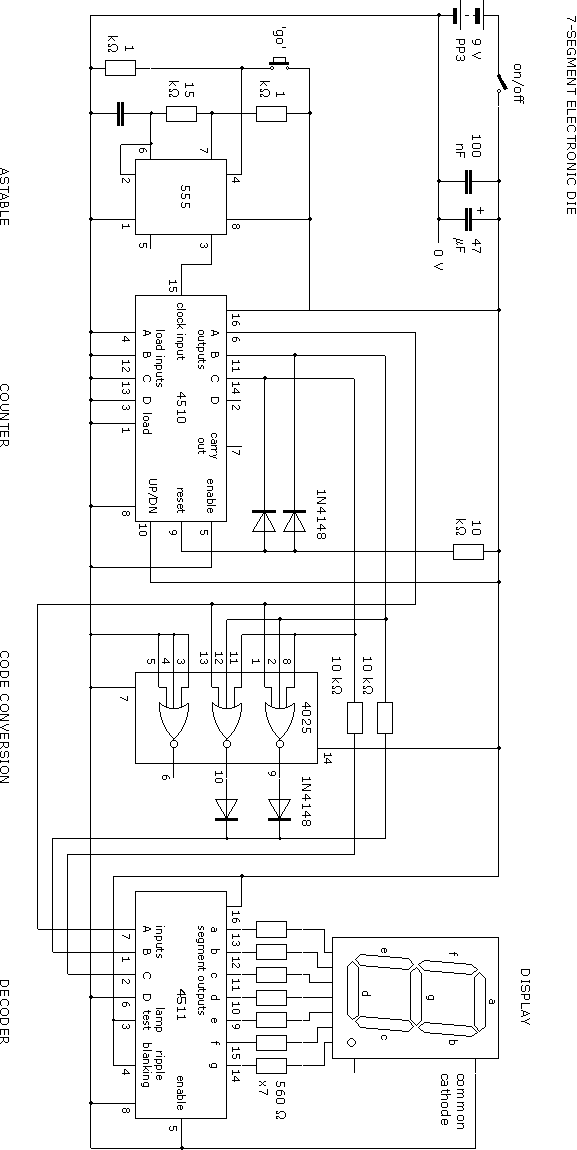
This circuit is described in detail in the DOCTRONICS book Discovering Electronics Projects. The book includes other types of electronic die such as the matrix die, available as a DOCTRONICS electronics construction kit.
![]() Up
Up
Joining, or cascading, counters allows you to count from 0-99 (two counter stages), 0-999 (three counter stages), and so on. The preferred method of doing this is by connecting carry out of the first stage to carry in (enable) of the second stage and driving both stages from a common clock:
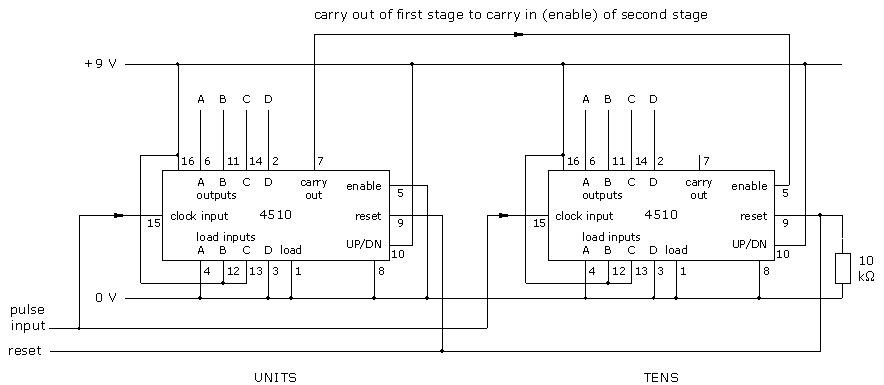
This pattern of connection gives synchronous counting, in which all of the outputs change simultaneously.
If you want to shorten the count, for example to make a 0-59 counter to count seconds in a digital clock, you must use a different type of connection between the counter stages:
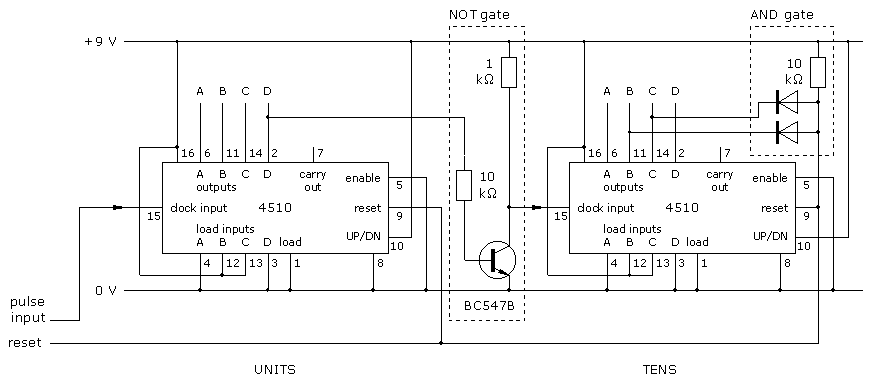
The diagram shows connections for a 0-59 counter. When the count on the TENS stage reaches 0 1 1 0, both stages are reset to 0 0 0 0. The transistor NOT gate is needed between stages because the count advances on the rising edge of the clock signal. To give normal up counting, the TENS stage should increment on the falling edge of the D output from the UNITS stage.
DOCTRONICS has published a whole book about Discovering Electronic Clocks. This includes a lot more information about the 4510 and other useful counter integrated circuits.
To get the 4510 to work properly in your application, it is essential to test circuits on prototype board. The 4510 is a versatile integrated circuit. Practical investigation is the best way to find out about and understand its features.
![]() Up
Up
![]() 4510 datasheet from
4510 datasheet from ![]()
Cross references in the Beastie Zone: 4511 BCD to 7-segment decoder driver, 4516 4-bit binary counter, 4518 dual BCD counter, 4520 dual 4-bit binary counter, 4017 5-stage Johnston counter.
Cross references in Design Electronics:
External links:
![]() Back to Design Electronics
Back to Beastie
Zone
Back to Design Electronics
Back to Beastie
Zone